hello!
i've been pressing on to complete a lot of items for the two craft booths i'm preparing this month. yesterday was the sugarplum holiday fair, and now that it's over, i am excited to share what i've learned.
it can be intimidating to put together a booth if you've never done it before. this was my fifth craft booth, so i'm certainly not an expert, but i'm learning as i go, and finding this process really fun. this is what works for me - which may not work at all for someone else. it really depends on how you want to display your items, how large, heavy, fragile or numerous your items are, and your own aesthetic.
for me, i want to use as few items as possible. i drive a camry. i need everything to fit in my car. i want tables to be lightweight and easily portable. i prefer to exhibit indoors (though i **love** to visit outdoor fairs) so i haven't needed to buy a canopy.
this year, in a 10 x 10 booth space, i used one standard-sized square coffee table, and
two 20" x48" tables by cosco. i could have possibly used another cosco table if i had one. i chose an L shaped arrangement for the tables...mostly because i was positioned right in front of the restrooms and didn't want to block access.
i brought my belongings in unfinished wood crates. one crate doubled as a display shelf, and the other became area to keep bags and behind-the-scenes items that aren't visible behind the booth. i also brought an ikea bag filled with a few display pieces, swiffer cloths and cleaning wipes (because you never know), and a plastic container that held some smaller items. i also brought some additional materials for creating signs and price tags (kraft paper, paper punch, sharpies, number stamps, stamp pad, washi tape), small plastic bags and brown paper bags.
 earrings three ways
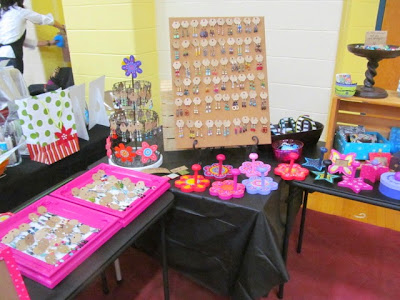
this is the first year i've displayed earrings, and my challenge for the past few weeks was figuring out how i would display them. i had visited a few shows where people used purchased black velvet-ish earring holders for each pair, and shows where people used purchased earring holders, with each earring attached to a separate hole in the rack. neither of those options sounded right for me. i wanted the customer to be able to pick up a pair of earrings without having to take them apart from a rack, and i wanted the earring holders to match the rest of my booth's aesthetic (and i didn't want to pay a lot for any of these things). i liked the idea of using framed chicken wire or a frame with stretched ribbon and hooks or clothespins, but the volume of earrings i'd made didn't seem to fit either of those options.
here are the ideas that stuck:
1. i made my own earring holders using kraft cardstock, a hexagonal paper punch, and two sizes of hole punches.
2. i elevated an unframed, cardboard-backed corkboard on a frame stand, and pierced sixty pins through it.
(yikes from behind the scenes:)
3. i used a three-tiered stand that i already owned, bought 4 packs of 8 picture hanging hooks for 88 cents each, bent them around the top two tiers, and put the stand on a turntable. (then, because this piece was also magnetic, i attached magnets to it in lieu of bringing a magnet board this year.)
4. i bought two deep frames on clearance, then inserted iridescent white glitter scrapbook paper.
there are some things i could have done differently. i could have chosen a different table configuration, as the display could have been somewhat hidden from one walking direction. i could have chosen tablecloths for all tables, but made the last minute decision against them. i could have used more shelves, or an additional table. but i received compliments on the earring displays, and loved the comments from little girls, including, "Ooh! Shiny Things!" and "This is fabulous!"
it was the best craft fair yet.


